After I posted my Pow running config Python script, my good friend and colleague Nolan Meyers sent over a link to [Powder](https://github.com/Rodreegez/powder), a gem for working with Pow. The list of things you can do with Powder is conveniently listed in the [README](https://github.com/Rodreegez/powder/blob/master/Readme.md).
Monthly Archives: November 2011
What exactly is “hacking” photography, anyway?
Andrew Cholakian says [you can’t hack photography](http://blog.andrewvc.com/you-cant-hack-photography) in response to Peter Norvig’s [article dedicating significant amounts of text to the technical aspects of creating photographic art](http://norvig.com/dance-photography.html?). You’ll noticed that I used the word “create” in my previous statement, which will stir up its own sub-controversy. There are a group of people who feel that photography it not art, and is definitely not creation, because you’re only capturing something, not creating it. This is where both that group of people, and Andrew, are wrong.
Photography is art. A great photographer sees a scene and very quickly develops a strategy to capture the essence of that scene. Think of the many times you’ve seen beauty with your eyes. How did you feel? Capturing that moment means capturing the feeling. The photographic image is a vehicle for all the emotions you felt while being there.
When technical individuals, like Peter Norvig, enumerate the mechanics of photography, they’re teaching the tools used to create. Leonardo Di Vinci created some of his greatest works by understanding not only the appearance of his subjects, but the way their bodies worked. This allowed him to *create*. He could see a man or woman in any natural pose because he understood how the body worked. He also understood the mechanics of his tools. Di Vinci knew when to use a pencil and when to use a brush. He knew exactly how to stroke the canvas in order to create his visions.
Many non-technical photographers cannot relate to mechanics because they learned through a different method. Some individuals are intuitive learners. They learn by trial and error: “When I do this, I get that.” “That” is never a technical concept, it’s a result. The next time they find themselves in need of “that”, they replicate the steps. They may not even think of it in such explicit detail. They just do it. It’s an intuitive process, not a list of steps or parameters.
Andrew claims you can’t hack photography, but I can’t find where that claim was supported. I’m not even sure what it means? Does this mean we can’t use the technical aspects of photography to create moving photographs? I’d certainly disagree with that. Composition, exposure, and depth-of-field are the photographer’s palette. If you don’t know how to conjure these elements on demand, then you’ll miss lots of opportunities to create a great photograph. How you learn them is up to the individual.
So what’s the appropriate rant? Many technical learners never get past the mechanics. Every photo remains an algorithm to be perfected. Their photographic output is largely without emotion because they’re not trying to create; they’re simply trying to replicate the scene.
A more appropriate rant, I believe, would be to encourage technical learners to apply their new-found skills in broader ways. Intuitive individuals “feel” the scene more naturally, but often struggle with the mechanics of their device resulting in lost opportunities. Technical individuals learn their device, but find it more difficult to identify the “feel” of the scene, resulting in lost opportunities. As it turns out, the two have a lot to learn from each other.
*Note:* I don’t mean this as an attack on Andrew or any other author. I think he’s got some things wrong, but I prefer to use direct language when I write, rather than litter the material with qualifications to avoid offense. I have a tremendous amount of respect for anyone who takes their time to write about their views. Otherwise, there would be no discussion.
Print the active Pow config in a readable format
[Pow](http://pow.cx/) is great. I don’t know why it’s taken me so long to make the switch from `rails s`. Pow is short on management utilities though; probably for good reason. Ideally, you never have to touch your Pow instance. It ‘just works’. I like to dig around under the hood though, so I put together this quick Python script that outputs the running Pow config in a format I can read.
#!/usr/bin/env python
# filename: powconfig
#############################################################################
# Print POW config with nice formatting #####################################
#
# Works as is with Python 2.6. For Python 2.7, ‘import simplejson as json’
# instead. Save this file to a location in your PATH and make sure it is
# executable. Then you can call ‘powconfig’ from anywhere and see the active
# POW configuration.
#############################################################################
import sys
import json as json
import httplib as http
conn = http.HTTPConnection(“localhost”)
conn.request(“GET”, “/config.json”, ”, {“Host”:”pow”})
resp = conn.getresponse()
data = resp.read()
print json.dumps(json.loads(data), indent=4)
sys.exit(0)
Save this script somewhere in your path and you can run `powconfig` from anywhere to see your running config, which looks like this:
bradland@macbookpro:~$ powconfig
{
“bin”: “/Users/bradland/Library/Application Support/Pow/Versions/0.3.2/bin/pow”,
“rvmPath”: “/Users/bradland/.rvm/scripts/rvm”,
“workers”: 2,
“dnsPort”: 20560,
“httpPort”: 20559,
“logRoot”: “/Users/bradland/Library/Logs/Pow”,
“timeout”: 900,
“domains”: [
“dev”
],
“dstPort”: 80,
“hostRoot”: “/Users/bradland/Library/Application Support/Pow/Hosts”,
“extDomains”: []
}
If you don’t care about formatting, you can simply add this snippet as a bash alias.
alias powconfig=’curl -H host:pow localhost/config.json’
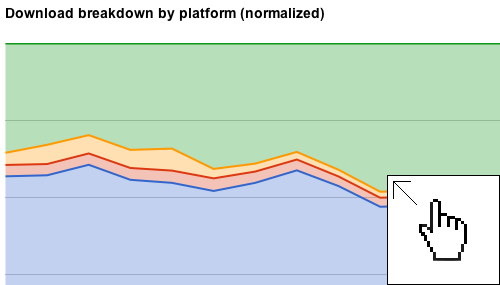
Visualizing the Sourceforge Download Data
Author Amy Vernon wrote an [interesting piece showing the change in download volume by platform over time at Sourceforge](http://sourceforge.net/blog/os-wars/). Sourceforge is in an envious position from a data perspective. Few sites have as high a download volume for such a wide variety of projects. I thought it would be fun to put together some additional visualizations of the data. I started with some Excel charts, but user [warpdude](http://news.ycombinator.com/item?id=3248713) over at Hacker News turned me on to the idea of using the Google Visualization API. Just a couple of quick changes to the source of his example, and we have a set of interesting graphs showing the same time-series data.
**Update:** Rich Bowen provided an [insight via Twitter](https://twitter.com/rbowen/status/137305778875936771) that much of the “other” data is from update services and non-browser requests. Hello, curl. We’re looking at you!
**Update 2:** Have a look in the comments for an update from Rich Bowen further addressing the concerns regarding ‘other’.
[](http://res.bradlanders.com/wp-content/visualizing-sourceforge-data/sourceforge-combined.html)
Bash one-liner: Copy current working directory to clipboard in OS X
I frequently find myself in need of copying the path to my current working directory. Under OS X, you can pipe the output of any command to the clipboard using the pbcopy and pbpaste (see `man pbcopy`). Easy enough with `pwd | pbcopy`, but you end up with a newline. No problem, `tr` to the rescue.
pwd | tr -d ‘\n’ | pbcopy
^[1] ^[2] ^[3] ^[4]
1. `pwd` prints the working directory; pwd outputs a newline, which isn’t very handy if you need to paste this elsewhere, and especially unhelpful in a shell
2. `tr` is short for translate characters (think find/replace); normally it takes two arguments, but passing the `-d` flag deletes the string passed as an argument from the stdin
3. `\n` is the escape sequence for newlines; the character we want to get rid of
4. `pbcopy` is the OS X bash clipboard tool; see also: xclip or xsel for X-Windows environments
Use `man
I’ve added the following as a bash alias so I can call this one quickly:
alias cpwd=”pwd | tr -d ‘\n’ | pbcopy”
Easy!
Backup: The same rules apply
It appears that Backify, a popular remote backup service offering a free plan, has cancelled all free accounts. Backify was a reseller of LiveDrive, the company that actually owns the infrastructure and software. Ivo Flipse [broke the news on his Google+](https://plus.google.com/112313173544747389010/posts/3D1jTWWSrKt “Backify cancels all free accounts”) page early this morning. If it sounds too good to be true… There’s no such thing as a free lunch… Ok, ok, I’ll stop. This is, undoubtedly, a jarring experience for the many users of Backify’s service. The lesson learned is that even in today’s world of offloaded complexity brought to you by software as a service, the same rules apply. Caveat emptor, and all that jazz.
This is a good time to take a step back and look at your backup strategy. I’ve read plenty of write-ups on backup strategies that involve copious amounts of drive shuffling and user maintenance, but the truth is that most of us don’t take the time for these tasks. After all, we all have plenty of other housekeeping duties like taking out the trash and cleaning the litter box. You do love cats, right? Where do you think all [these cat pictures](http://icanhascheezburger.com/) come from? Swapping out backup drives isn’t something I want to do, so I’m pretty sure you don’t want to either. Here’s my “no touch” backup strategy.
A good backup strategy meets the following criteria:
* Creates multiple copies of your data – what if one fails?
* Keeps these copies in separate geographical locations – what if you have a fire or flood?
* Works without your involvement – I’ll be the first to admin, I’m lazy.
* Runs quickly and frequently – what good is a backup if you lose everything you’re working on?
Before we go any further, let me address the question I get most frequently: [Do I need a backup?](http://www.google.com/search?q=i+think+my+hard+drive+is+dead “Do I need a backup?”) I won’t answer it directly. I’ll let the over 42 million Google results speak for themselves.
Let’s talk about costs for a moment. The Backify situation underscores an excellent point. *Things are often worth exactly what you pay for them.* When thinking about your backup strategy, ask yourself this question: “If someone took my computer from me today, how much would I pay to get it back?” If your answer is “Nothing, I’d just go buy another one.” Stop reading here and go enjoy your carefree, zero-attachment life. No cynicism implied. Seriously, go back to what you were doing, and drink a cold one for those of us trudging away at our daily tasks. If you’re like me, your heart rate increased a little while asking that question. I’d pay large sums of money to get my computer back. If someone said, “I’ll give it back for $250,” I’d be elated. A good backup strategy is *worth paying for*.
This leads me to unveil the two paid services I use, as well as the one free one:
* [Backblace](http://www.backblaze.com) – $50/year or $5/monthly for unlimited storate
* [Dropbox](http://www.dropbox.com) – $99/year or $9.99/monthly for 50 GB of storage
* [TimeMachine](http://www.apple.com/macosx/apps/#timemachine) – Included in OS X (Windows also has [built-in backup](http://windows.microsoft.com/en-US/windows7/products/features/backup-and-restore))
But Brad, the two paid services above only cost $150/year? You said $250! The extra $100 is because you’ll need to purchase a backup hard drive for use with TimeMachine, or Windows backup, err whatever. I recommend an external in the 2.5″ size (the smaller of the two available), because they don’t require an external power supply. You’ll need one that is at least as large as your computer’s hard drive. Larger is better, as TimeMachine will store multiple versions of your files if it finds the space. This is handy when you realize you accidentally deleted three crucial paragraphs from your proposal during editing. TimeMachine will let you recover a previous version.
Here’s how these services tie in to the “good backup strategy” I outlined above:
**Create multiple copies**
TimeMachine, Backblaze, and Dropbox all create separate copies of the files.
**Keeps these copies in separate geographical locations**
TimeMachine backs up to the external disk on your desk. Backblaze backs up to their data center. Dropbox backs up to their data center, and in my case, to the other iMac sitting in my office, so it’s both local and remote.
**Works without your involvement**
Outside of archiving to the Documents folder when my Dropbox folder gets full, the backup process is hands-off. I use [DaisyDisk](http://daisydiskapp.com/) for Mac and [WinDirStat](http://windirstat.info/) for Windows to identify large folders.
**Runs quickly and frequently**
Because I leave the external drive plugged in all the time, and TimeMachine only copies new and changed files, it runs very quickly. Backblaze has to upload files, so if I create a large file, it can take a while to update. It is recommended that you exclude extremely large files from your Backblaze backup, but you do this at your own risk. Dropbox, because it can sync over my network, backs up very quickly to the iMac on Angel’s desk in my office. It also uploads quickly thanks to my Comcast connection’s fast 3 mbps upload.
The really great part about this backup strategy is that it’s dead simple to set up. Each of these applications has a very simple installer that only takes a few steps to get running. When you couple that with the four points of solid backup strategy, I’m not sure I can do much better without a lot more effort.
So what’s your backup strategy? See any ways I could improve my plan? [Tell me about it](https://www.facebook.com/brad.landers).